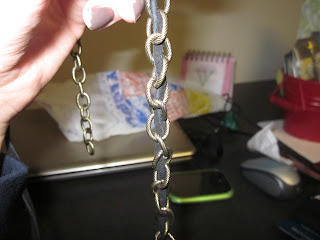
I am so happy to have finally finished this project! I bought all the materials back home before I came back to school, and I finally got around to finishing it this afternoon! My original plan was to follow the exact directions from studs and pearls for the Lanyard Double Chain Bracelet (http://www.studs-and-pearls.com/2011/09/diy-lanyard-double-chain-bracelet.html), but sadly, I purchased the wrong kind of chain, so I tried, but my efforts failed. However, I might try to make it again, this time with the correct type of chain! Nevertheless, I like what I came up with, and it still has the same idea of the studs and pearls bracelet.
Here's what you'll need:
- Enough chain to go around your wrist twice (I bought mine the length that you see above, and didn't cut it, so if you're going to cut yours... I have no tips on how to help you. Godspeed.)
- Jump rings (I bought a package of like, 100 & used 5)
- Lobster clasps (you'll only need one, but I bought a 4-pack for future use, it's cheaper that way)
- Leather cord (You can buy the huge spool if you'd like, but that's about $15, and mine was around $4, and I still have plenty left over)
- Needlenose pliers (I think people who aren't from East Texas know these as jewelry pliers. I didn't have any, so I improvised...with a wrench. It was painful.)
And Here's what you do! :
1. First, cut a piece of leather cord, about 55-60 inches. I cut mine 60 inches when I was attempting to make the first bracelet, and so I just kept it. But I cut off around 5-7 inches when I was done, so it was a little long.
2. Locate the center link of the chain. This can be easily done by folding the chain in half, matching the two ends up, & see which link is the middle. Thread the leather cord through the center link, making sure both tails of the cord are even.
Also, to make sure you don't lose the center link (this will matter more once you start threading the cord on both sides), tie a small piece of ribbon around the center link. Or you could go ahead and put a jump ring on.
3. Begin threading the leather cord through each link of the chain. Make sure you don't pull too tight or the chain will get all caddywompus, and we can't have that, now can we?? But seriously, make sure the chain stays somewhat flat, and be careful not to twist the leather.
4. Continue threading the leather through the chain until you reach the end of that half of the bracelet. This is what you should have:
5. Repeat steps 3 and 4 for the other side of the chain. 6. Once you finish threading the cord, you'll need to tie off the leather. Before you cut it, bring the end of the cord back through the last link of chain, towards you. You should then have a loop of leather cord at the top of the link. Bring the end of the cord up through that loop, away from you. After you pull tight, you should have a small knot.Just cut the excess cord off and it should be sturdy! (I understand that these instructions are a little difficult to understand, but I have full confidence that if you've gotten this far, you must have some level of intelligence and will be able to figure something out. Use your problem-solving skills.)
7. On the center link (the one you tied the ribbon to), attach two jump rings. The easiest way to do this is to open just one, using the pliers. Or you can pry it open with your fingers like I did, but my broken fingernails and still-hurting fingers strongly urge against it. Next, slip the ring onto the center link, but don't close it yet! Take a second closed ring and slip it onto the open ring. Then, again using the pliers, squeeze the first ring closed, making sure it is closed tightly so it doesn't break.
8. Next, on the end with the two leather knots, attach a jump ring to both of the end links on each side, and then connect them to each other
9. Then, open a new jump ring and slip it onto one of the two jump rings attaching the loose ends. Place a lobster clasp on the open ring, and then close it with the pliers, making sure it's closed tightly!
And you're done! Here's what it looks like! I'm super excited to wear this! I hope you will try this, and give it your own little spin! You could use different colored leather cord or chain, or you could use lanyard or even strips of fabric. I chose the black and gold just because it's versatile and classic, but I will probably make another one that's a little more trendy! I don't really know what my next project will be, and I'll probably just post a blog post without a craft next, because school/life is about to start getting a little cray. So if you don't hear from me, I was most likely taken captive by Psych 107 and Comm 243, so please come find me. Until next time!


