Hey Cats!
First of all, Happy New Year! I hope you had a great time celebrating with your friends and family! I didn't do a lot, I just got dressed up and went to dinner with a friend, and then we ended up back at my house watching the Kardashians in our yoga pants and eating queso. And it was really fine with me. As for New Year's Resolutions, I don't really do those. I like the concept of having "goals" better than "resolutions" because I feel like it's more motivating. My goal for 2013 is to make a 4.0 at least one semester, or maybe both. So we'll see how that works out. Anyways, as of right now 2013 has the potential to be a fantastic year. Lots of exciting things are on my calendar, and I can't wait! Here are some of the things I'm already looking forward to:
1. Texas A&M in the Cotton Bowl- This happens in three short days! I have been missing Aggie football, and I'm glad we have one more game before the fall. BTHO ou.
2. Spring semester starts in less than two weeks- Which means I get to go back to my friends in College Station in a little over a week! I've loved being home, but I'm ready to be back in my regular routine and use my planner and drink coffee every morning.
3. The Bachelor premieres January 7th- And I am dying. Sean was my absolute fave on the Bachelorette, because he loves Jesus and is a Texas boy, and I mean, have you SEEN him? omg. I think that if Emily had picked him she wouldn't be single right now, but whatever. I cannot wait to watch it instead of doing my homework every week.
4. Pretty Little Liars comes back January 8th- And we all know how I feel about that. Obsessed.
5. Emerald Green as Color of the Year. This is just so great. I love jewel tones, and I love green. I will be on a year-long mission for all things this hue, just so you're aware.
6. Kate Middleton is having the Royal Baby this year. I just love the Royal Family, especially Wills & Kate. Well, mostly just Kate. I mean, she is perfect and she earned the ultimate MRS degree, which is to be admired. I cannot wait for the next heir to the throne to come into the world, because I'm sure it will also be perfect.
7. The Great Gatsby premieres May 10th. I am literally beside myself about this one. It's one of my favorite books of all time, and I am obsessed. The story of fabulous city life in the 20's- perfect. Also, Leonardo DiCaprio is absolutely perfect for the role of Jay Gatsby, especially since he's put on a little weight since his Titanic days (but still, I'll never let go, Jack!) Sometimes when I get bored I watch the trailer and freak out about this upcoming cinematic masterpiece. Going. To. Die.
8. I will be halfway done with college in May. Eeeeee! I don't know how I feel about that, I kind of want to stay forever.
9. My cousin is getting married in July! She is the cousin I have been closest to my entire life, and was my first best friend. I am so excited for her! Also, it's the first wedding I'm actually in, so I'm excited to be a bridesmaid!
10. I'm turning 21 in August! The last exciting birthday. After that, you're just old.
11. Catching Fire premieres November 22. Katniss Everdeen is my hero and makes me want to learn to do outdoorsy things. I read the entire Hunger Games series this summer, and I loved it, and I've been dying for the next movie. Dying.
12. Britney is finally giving us new music. Okay, so this isn't exactly confirmed (it's not even rumored), but I can dream, right? I mean, 2012 was a great year for the Princess of Pop. I absolutely loved watching her be sassy on X-Factor, and I think we're all more than ready for more Britney.
13. Another great year of life. While I'm excited about all of these things, I might be even more excited for the unexpected things that will come throughout the year. That's what makes life interesting and wonderful, and I cannot wait to see what God has in store for me in 2013!
Meow until next time!
Showing posts with label college. Show all posts
Showing posts with label college. Show all posts
Tuesday, January 1, 2013
Wednesday, December 5, 2012
#finals2012
Hey Cats!
So, it's finals week.
Gross.
Actually, I have a love-hate relationship with finals. Hate for the obvious reasons of "I've been in the library since dawn and I have NO RECALL OF THIS INFORMATION WHATSOEVER", and love because it means classes are almost over and I can go home and eat real food and blog and craft for days. And they mean I will soon find out my GPA for the semester, which makes me really excited. As long as it's good. Which brings me to my next point.
I have BIG NEWS EVERYONE. I think I have decided what I'm going to do with my life. Finally.
I have decided to go to law school! Well not like, now, obviously, since I'm only in my second year of college, but I have decided to head in that direction. I've been thinking about being a lawyer for a long time, but I finally decided to commit and make it my actual, concrete goal. AND I AM SO EXCITED ABOUT IT. Last week I went to pre-professional advising and had a nice, encouraging chat with Karen. It was so great, she was such a gem. Hopefully this is actually what I want to do and I haven't just been watching Legally Blonde too much.
So there's that.
Also, I've been thinking about what I plan to do with my time over Christmas break. First, I will sleep. For as long as I want. And it will be blissful. You see, I somehow got 8 a.m. classes four days a week this semester, and I seem to have something to do early every Saturday, so I can't remember the last time I slept in. Next, I will frantically run around and buy everyone Christmas gifts. I have an idea of what I'm getting my Princess SisterCat, but I can't say because she will read this. I have NO IDEA what I'm getting my parents. Maybe I'll just limit my whiny phone calls to once a week, they will LOVE THAT. After I have all my shopping done, I will catch up with my high school friends. They're so great, and I love them. Most of us are scattered all over the place, so we only see each other during Thanksgiving/Christmas/Summer breaks. We're already planning a potluck dinner, since we're all so excited that we're basically gourmet chefs now that we don't live in the dorms.We'll also probably FREAK OUT about the fact that WILLIAM AND KATE ARE HAVING A BABY OMG. Out senior year was the Royal Wedding, and we stayed up all night and had a party and woke up at 4 to watch it live and wore dresses to school. So we'll obviously be having a baby shower for them. Also, I'll be hanging out with my Princess SisterCat. We're besties, and we're going to have a great time being together for an entire month. Especially when we have our Christmas Eve sleepover! I can't wait. I'll also eat way too much, but luckily big bulky sweaters are in. Just kidding. Kind of. And then I'll do whatever I want, but that's not any different from any other day of my life.
As I mentioned earlier, it's finals week. So I leave you with this. I hope you can control yourselves better than this girl. (sometimes I feel like doing this to the annoying freshman couple that makes out on the couch in the libs, but I don't. Thank God.)
Until next time!
Tuesday, September 18, 2012
Kristen Learns to Cook- Part 1
Hey Cats!
Since you last heard from me, I have moved into a new house, gone back home once, witnessed the Aggies lose their first SEC game (can't even talk about it), and attended 3 &1/2 weeks of school. During this time, I have been perfecting my cooking & other domestic skills like cleaning and entertaining. But mostly cooking. That was one reason I was so excited to move out of the dorm and into anywhere with a kitchen. I absolutely love being able to make whatever I want for dinner, and not being forced to eat either a Lean Cuisine or junk food from the places on campus. Throughout the past month, I've also discovered that I love to cook dinner. It's fun to come up with new ideas & try out new things. So, I have decided to blog about my adventures as I learn to become a gourmet chef. Although I started this process a few weeks ago, I still have a long way to go (I burn something at least once a week) and I'd love to share my kitchen endeavors with you! I typically cook small portions, usually just myself, and I use what I have in my pantry (which isn't a lot), unless I'm dying for something different. So, without further ado, here's what I'm having for dinner tonight!
Salsa Chicken
I half made this recipe up and half got it off the internet. It's been about a week and a half since I've been to the grocery store, so I have very little to work with. I also bought a jar of salsa for the 1/4 bag of tortilla chips I had left over, and the chips are gone but the salsa is still here. I also didn't have taco seasoning, so I had to get creative. I'm eating it as I type this, so I know it's delicious!
Here's what you'll need:
1 or 2 small boneless, skinless chicken tenders, thawed. (I bought a huge bag of individually frozen tenders. They're smaller than chicken breasts, and they will last you literally forever. This is a staple in my fridge.)
Salt
Pepper
Garlic Powder
Onion Powder
Chili Powder
At least 1/2 jar of salsa (I used Joe T's because that's my fave.)
Shredded cheese
Here's what you do:
1. Preheat your oven to 350
2. Lay the chicken in a small baking dish, and sprinkle seasonings on both sides.
3. Spoon salsa (however much you want) on top of the chicken.
4. Bake for 25 minutes. Be sure to cut into it & make sure it's cooked, I've heard food-borne illnesses are quite unpleasant.
5. Sprinkle a little cheese on top & pop it back into the oven for a few minutes until the cheese has melted.
6. DINNER.
I paired mine with a little rice & corn for a balanced meal. I keep bags of frozen vegetables like corn & green peas on hand & throw a little into a bowl with a splash of water into the microwave for about 3-5 minutes. That's probably not the best way, but it's better than not eating vegetables, and I don't have to clean an extra pot.

So there it is! It was super delicious if I do say so myself. Hopefully I'll go to the grocery store soon & come up with some new ideas! Until next time!
Friday, July 20, 2012
DIY- Ribbon Board Re-Do
In 21 days, I will be moving back to the Promised Land, into a house with three other girls. And I am SO EXCITED. Since I'm transitioning from the dorm to a real house, I've changed things up a little bit, including the color scheme of my room. You may remember that I went with a beach theme in the dorm, light blues, greens, coral, etc. This time around, I've decided to go with light blue, gray, and dark purple. I've been able to keep a lot of my blue stuff, like my bedspread, pictures, lamps, and pillows. I've also decided to re-do a couple of things I already had. I didn't want to part with some of it, and I still needed some, so instead of spending lots of money on buying new things, I spent a little money on updating them! One of the things I had that I absolutely loved and did not want to get rid of was a memory board my aunt made for me. I love pictures, so I obviously can't do without one of these. The only problem was that it was lime green, which totally doesn't match my room anymore. So I got some new fabric & ribbon, and an hour or so later, I had an updated version of one of my dorm room faves!
 |
| This is what I started with. Isn't it cutie? Sadly, not with purple and blue. |
Here's what you will need:
-1 memory board (Mine is made out of one of those posterboards with the foam and a thin layer of cotton quilt batting. If you have one you bought from somewhere, you could still try this, but it will probably be more difficult to take apart, but I have faith in you. Just don't injure yourself. OR if you want to make one, just get one of the posterboards mentioned above & some quilt batting!)
- Enough fabric to cover the front of the board. I used 1/2 of a yard, and have plenty left over to make pillows with!
-Ribbon. I just used one spool, but I probably should have used two.
-Brads, furniture tacks, or buttons. I used some really cute brads from the scrapbooking section in Hobby Lobby.
 |
| I hadn't bought the brads yet. Sorry. Also, that's my favorite nail polish. |
Here's what you do:
1. First, remove all the buttons or tacks from the board. Mine were buttons, so it was fairly easy to just cut them off, but if yours has tacks, it might be a little harder.
2. Second, using a staple-puller, flat screwdriver (what I used), scissors, or your fingernails (which I wouldn't reccommend, then they'll look like crap), remove the ribbon. Make sure you don't accidentally remove the staples that are holding down the fabric, just the ribbon!

3. Next, measure and cut the fabric. I did this by laying the fabric print-side down on the floor and laying the board fabric-side down on top of it. Then I cut it, leaving enough fabric on each side to overlap & staple down on the back. Also, make sure you iron your fabric before you staple it, because wrinkles are ugly, and that it's pulled really tight, because it will also be ugly if it's loose.
 |
| Before I cut it, obviously. I used the existing fabric as a guide for how much fabric to overlap. |
 |
| This is the double fold, before I started stapling. Make sure it extends a little further than the original fabric. |
 |
| Here's what the back looks like finished! |
 |
| And here's the front! |
 |
| It's not very pretty, but you get the idea. |
 |
| Be sure to pull it really tight, or your pictures will fall out! |
7. Do the same thing on the opposite corners.
 |
| I'm running out of things to say for photo captions... |
 |
| I probably could have used more ribbon, but this will be fine, too! |
 |
 |
| If you're using buttons, skip this step & just sew it on. Good luck with that. |
 |
| It's a rose!
|

So there it is! This was super easy and inexpensive, and I can't wait to put it up in my room and fill it with pictures! I have a few more DIY's coming soon, and hopefully I'll be able to do another recipe before I leave for school! Until next time!
Thursday, January 19, 2012
Smoothies & String Cheese
Hey Cats!
So, it's Thursday night. You know, most college kids go out on Thursday nights, and I usually like to do that too, but tonight....well, I don't really want to talk about why I'm sitting in my dorm with nothing better to do than blog about random things. ANYWAYS, here I am, listening to Phil Wickham Pandora & eating string cheese & drinking a smoothie for my dinner. Healthy, right? You know, it's really hard to find good things to eat when you live in a dorm and your only appliance is a microwave. Although I've only lived in the dorm for a semester and a week, I like to think that I've gotten pretty creative with my food choices. For example, the smoothie I'm currently drinking. If allowed, you should get a small blender for your dorm. Mine is a single-serving "power blender" (whatever that means) & its the Cooks brand from JCPenney. It was on sale for like, $30 during the summer, so I bought it for my room, & it's come in handy when I want something different! For my smoothies, I buy the frozen packages that have yogurt chunks (which is super weird when you think about it) and fruit, and just add apple juice! It's a lot more convienient than keeping fresh fruit, and since I don't make smoothies super often, it's good because it doesn't ruin, like fresh fruit would. Another idea is Lean Cuisines. Duh. I just thought I'd add that, since they are kind of a staple in my diet. Also, I like Laughing Cow cheese wedges with the mini saltine crackers. I'll eat that & some fruit for lunch occasionally. Another useful tool is an apple wedger/slicer/corer? (not sure of the technical name.). I've always wanted one & I told my mom that I'd eat fruit in college if she got me one... hehe. But really, it's very nice to have. I like to eat apples with peanut butter for a snack, it's healthy and very filling! Another thing I like is 100 calorie packs of popcorn. Quick and delicious. Enough said. Actually, 100 calorie packs of anything are quite wonderful. I feel better about my snacking if it's already a controlled portion. For breakfast, I like oatmeal, even though its a pain to clean out the bowl. Other ideas are granola bars, hummus and Wheat Thins, soup, Nutella (not exactly healthy, but quite delicious), cherry tomatoes, almonds, tea, coffee, carrots & ranch, and water. Oh, I suggest a filtered pitcher rather than buying bottles of water. Not only is it cheaper in the long run, but you don't have to carry heavy bottles up the stairs to your room! Anyways, I hope you all enjoy this super random post about things you probably already know. But if it was of assistance to any of you, then I've done my job. Well, I'm going to go read my Political Science book, but I am working on a new DIY that will hopefully be posted soon! I tried to follow instructions from another blog. but I bought the wrong stuff, so I'm just going to make something up. Until next time!
So, it's Thursday night. You know, most college kids go out on Thursday nights, and I usually like to do that too, but tonight....well, I don't really want to talk about why I'm sitting in my dorm with nothing better to do than blog about random things. ANYWAYS, here I am, listening to Phil Wickham Pandora & eating string cheese & drinking a smoothie for my dinner. Healthy, right? You know, it's really hard to find good things to eat when you live in a dorm and your only appliance is a microwave. Although I've only lived in the dorm for a semester and a week, I like to think that I've gotten pretty creative with my food choices. For example, the smoothie I'm currently drinking. If allowed, you should get a small blender for your dorm. Mine is a single-serving "power blender" (whatever that means) & its the Cooks brand from JCPenney. It was on sale for like, $30 during the summer, so I bought it for my room, & it's come in handy when I want something different! For my smoothies, I buy the frozen packages that have yogurt chunks (which is super weird when you think about it) and fruit, and just add apple juice! It's a lot more convienient than keeping fresh fruit, and since I don't make smoothies super often, it's good because it doesn't ruin, like fresh fruit would. Another idea is Lean Cuisines. Duh. I just thought I'd add that, since they are kind of a staple in my diet. Also, I like Laughing Cow cheese wedges with the mini saltine crackers. I'll eat that & some fruit for lunch occasionally. Another useful tool is an apple wedger/slicer/corer? (not sure of the technical name.). I've always wanted one & I told my mom that I'd eat fruit in college if she got me one... hehe. But really, it's very nice to have. I like to eat apples with peanut butter for a snack, it's healthy and very filling! Another thing I like is 100 calorie packs of popcorn. Quick and delicious. Enough said. Actually, 100 calorie packs of anything are quite wonderful. I feel better about my snacking if it's already a controlled portion. For breakfast, I like oatmeal, even though its a pain to clean out the bowl. Other ideas are granola bars, hummus and Wheat Thins, soup, Nutella (not exactly healthy, but quite delicious), cherry tomatoes, almonds, tea, coffee, carrots & ranch, and water. Oh, I suggest a filtered pitcher rather than buying bottles of water. Not only is it cheaper in the long run, but you don't have to carry heavy bottles up the stairs to your room! Anyways, I hope you all enjoy this super random post about things you probably already know. But if it was of assistance to any of you, then I've done my job. Well, I'm going to go read my Political Science book, but I am working on a new DIY that will hopefully be posted soon! I tried to follow instructions from another blog. but I bought the wrong stuff, so I'm just going to make something up. Until next time!
Monday, August 15, 2011
DIY- Nautical Wastebasket
Hey Cats!
It's been SO LONG since I've posted! I've been super busy with camps and getting ready for college, so I haven't really had time to blog, much less craft! This is something for my dorm room, and I feel like it's kinda cheating, because I painted it with my friends at the beginning of summer. But I'm going to share anyways! As I may have told you, my room is a beach theme. I wanted to incorporate the theme without making it look like a tacky beach house, which has been slightly difficult. I thought that the little rope detailing on this trashcan gave it just the right touch of nautical-ness. You can definitely change this up to match whatever room you're wanting to put it in. I've actually painted one for my room at home, and my sister painted one for our bathroom. It's a great way to add a pop to a room, and it's a good small project when you're feeling slightly crafty. Anyways, here's what you'll need:
 - 1 wooden trashcan (I've always gotten them at Hobby Lobby)
- Acrylic paint of your choice (navy & white for stripes)
- Masking tape (for making stripes)
- Hot glue gun
- 1 piece of clean rope that will go around the top of your trashcan
Here's what you do!
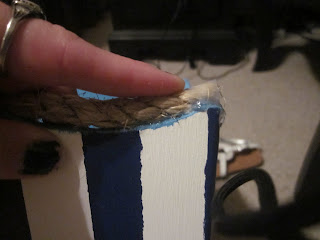
1) Paint your trashcan in whatever color or pattern you'd like. For my stripes, I painted the entire trashcan white (I'd recommend using multiple coats). Then, I placed masking tape in straight lines, leaving stripes in between the tape that were the width of the tape. Make sure you press down the edges of the tape so the paint doesn't seep through. Paint the spaces in between the tape and remove the tape when it's dry! I also recommend painting the inside and bottom of the trashcan for a more polished look.
2) Next, cut your rope to a length that will go all the way around the top of the trashcan, giving yourself no more than an inch extra.
3) Tape the ends of the rope so it doesn't fray.
 4) Glue one end of the rope to a corner of the trashcan, making sure it lines up directly. You should use a thin line of glue and will probably have to hold it down a while for it to stay.
 5) Continue gluing the rope onto the trashcan in small sections.
6) When you reach a corner, chances are (unless you use super skinny rope) you will have to cut the corner in order to turn. Just glue the rope all the way to the corner and then just skip the pointed part of the corner. This is a little hard to explain, so just look at the picture :)
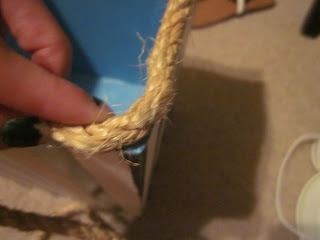 7) Continue gluing the rope until you reach your starting point. You might have a little rope left over, but don't cut it off!
 8) Take the extra rope and glue it on top of the other rope, as if you were going to wrap it around again. This time will require LOTS of glue, and you'll probably need to hold it down for a few minutes to make sure it sticks.
 I know this looks a little messy, but just put this part against the wall :)
And you're done! Here's what it looks like!


 I'm super excited about this, and I can't wait to see it in my dorm room in 6 DAYS!!! OMG. That being said, since I'm going to college and might have actual social events to attend, I'm not really sure how often I'll be crafting. I won't give it up of course, but it might not be such a giant part of my vida anymore. :( BUT I'm taking all my stuff with me! I have a tub to put it in and everything! So, until next time, whenever that may be!
It's been SO LONG since I've posted! I've been super busy with camps and getting ready for college, so I haven't really had time to blog, much less craft! This is something for my dorm room, and I feel like it's kinda cheating, because I painted it with my friends at the beginning of summer. But I'm going to share anyways! As I may have told you, my room is a beach theme. I wanted to incorporate the theme without making it look like a tacky beach house, which has been slightly difficult. I thought that the little rope detailing on this trashcan gave it just the right touch of nautical-ness. You can definitely change this up to match whatever room you're wanting to put it in. I've actually painted one for my room at home, and my sister painted one for our bathroom. It's a great way to add a pop to a room, and it's a good small project when you're feeling slightly crafty. Anyways, here's what you'll need:

- Acrylic paint of your choice (navy & white for stripes)
- Masking tape (for making stripes)
- Hot glue gun
- 1 piece of clean rope that will go around the top of your trashcan
Here's what you do!
1) Paint your trashcan in whatever color or pattern you'd like. For my stripes, I painted the entire trashcan white (I'd recommend using multiple coats). Then, I placed masking tape in straight lines, leaving stripes in between the tape that were the width of the tape. Make sure you press down the edges of the tape so the paint doesn't seep through. Paint the spaces in between the tape and remove the tape when it's dry! I also recommend painting the inside and bottom of the trashcan for a more polished look.
2) Next, cut your rope to a length that will go all the way around the top of the trashcan, giving yourself no more than an inch extra.
3) Tape the ends of the rope so it doesn't fray.


6) When you reach a corner, chances are (unless you use super skinny rope) you will have to cut the corner in order to turn. Just glue the rope all the way to the corner and then just skip the pointed part of the corner. This is a little hard to explain, so just look at the picture :)


And you're done! Here's what it looks like!


Monday, July 25, 2011
DIY- Cute As A Button Frame
Hey Cats!
As you may or may not know, I will be going off to college in the fall (yay!), so I have been collecting things to decorate my dorm room and make it feel more like home. I picked up a long collage frame on one of my many trips to Target, but I was worried that it would be too much blue, since I already have lots of blue things (comforter, pillows, lamp, trash can, hangers...you get the picture). My mom suggested that I paint a design on it to add some color, but I didn't really feel like painting, since all I can do is flowers and hearts. So, I decided to glue buttons onto it! It took maybe 30 minutes, and it was super easy! Except for when I burned myself. Anyways, here's what you do!
You will need:
-An inexpensive collage frame (mine was $12.99 from Target), or you could do a mirror or a regular-sized frame.
 -Assorted buttons. I bought Grandma's Grab Bag from Hobby Lobby last year, and I'm still using it! You could also use rhinestones in place of buttons. (I used 2 in random spots)
 - A hot glue gun
Here's what you do!
1) Decide where you would like the buttons on the frame. I placed mine and then moved them around to make sure I liked where they were. Do this first, because once they've been glued down, they won't be easy to get off!
2) Glue them on!
And you're done! A tip is to wait until the glue has cooled to clean off the little strings, because if it is still hot, it will just stretch out even more. I waited until I had them all glued on and then cleaned it off.
Here's how it turned out!


 Since this was so easy a child could have done it, I guess it was more to show you what I made than to tell you how to do it yourself...but I wanted to share! I hope you try this, it's a great way to make anything a little more personal and unique! And also, I have an idea of what my next DIY is, and it's great! I'm so excited! Until next time!
As you may or may not know, I will be going off to college in the fall (yay!), so I have been collecting things to decorate my dorm room and make it feel more like home. I picked up a long collage frame on one of my many trips to Target, but I was worried that it would be too much blue, since I already have lots of blue things (comforter, pillows, lamp, trash can, hangers...you get the picture). My mom suggested that I paint a design on it to add some color, but I didn't really feel like painting, since all I can do is flowers and hearts. So, I decided to glue buttons onto it! It took maybe 30 minutes, and it was super easy! Except for when I burned myself. Anyways, here's what you do!
You will need:
-An inexpensive collage frame (mine was $12.99 from Target), or you could do a mirror or a regular-sized frame.


Here's what you do!
1) Decide where you would like the buttons on the frame. I placed mine and then moved them around to make sure I liked where they were. Do this first, because once they've been glued down, they won't be easy to get off!
2) Glue them on!
And you're done! A tip is to wait until the glue has cooled to clean off the little strings, because if it is still hot, it will just stretch out even more. I waited until I had them all glued on and then cleaned it off.
Here's how it turned out!


Subscribe to:
Posts (Atom)