Showing posts with label DIY. Show all posts

Wednesday, April 17, 2013

Recipe-Easy Alfredo Sauce

Hey Cats!

The other day I was looking for something different to make for dinner, and I had leftover whipping cream from another recipe. So naturally, I thought of alfredo sauce. I really enjoy alfredo on pasta, but it's really rich so I don't eat it very often. Also, I thought it was going to be difficult to make, but it was actually really easy! I found this recipe on Pinterest, but adapted it a little by using ingredients I already had! Here's the original recipe http://ericagilliam.blogspot.com/2011/11/homemade-alfredo-sauce.html. And here's my version!

You will need:

I always buy the HEB brand-it's cheaper, and sometimes tastes better!

-4 Tablespoons of butter
-1 Cup heavy whipping cream
-6 Tablespoons Monterey Jack cheese (the original recipe calls for parmesan, but I had MJ on hand! I also want to try this with mozzerella!)
-Garlic powder to taste
-Black pepper to taste

Here's what you do!

I feel Paula Deen would approve this recipe.
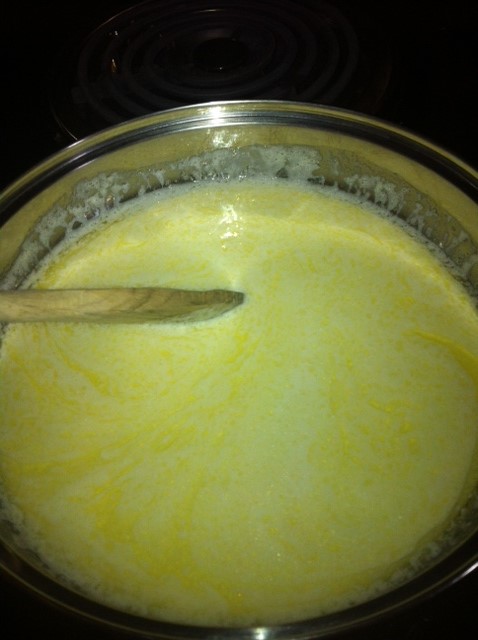
1. First, melt the butter over medium heat in a medium-sized saucepan.

2. Next, pour in the cream and heat until it is warm, about 3-5 minutes. Make sure you're still on medium heat, you don't want to burn the cream!

3. Then, whisk in the cheese! I added a little more than 6 tablespoons, because I love cheese. Whisk until there are no more lumps, about 1-2 minutes. I'm also hoping to try this recipe with a variety of cheeses.

4. Add the garlic powder and pepper according to your preferences. I added quite a bit to give it a little extra flavor, but make sure you start small and add a little at a time-once it's in you can't take it out!

5. Let it simmer for about 10-12 minutes, stirring occasionally. This thickens the sauce and allows the flavors to mix together.

6. Finally, pour it over your pasta and enjoy! Also, this is my new favorite type of pasta. It's called cellentani, and I love the fun squiggly shape. It also holds a lot of sauce, which is the best part of pasta.

I hope you give this recipe a try! It's really easy, delicious, and there's not a lot to clean up! You could make it a little fancier and add grilled or sauteed chicken and peas, cherry tomatoes, or anything else you can think of! Until next time!

Tuesday, September 18, 2012

Kristen Learns to Cook- Part 1

Hey Cats!

Since you last heard from me, I have moved into a new house, gone back home once, witnessed the Aggies lose their first SEC game (can't even talk about it), and attended 3 &1/2 weeks of school. During this time, I have been perfecting my cooking & other domestic skills like cleaning and entertaining. But mostly cooking. That was one reason I was so excited to move out of the dorm and into anywhere with a kitchen. I absolutely love being able to make whatever I want for dinner, and not being forced to eat either a Lean Cuisine or junk food from the places on campus. Throughout the past month, I've also discovered that I love to cook dinner. It's fun to come up with new ideas & try out new things. So, I have decided to blog about my adventures as I learn to become a gourmet chef. Although I started this process a few weeks ago, I still have a long way to go (I burn something at least once a week) and I'd love to share my kitchen endeavors with you! I typically cook small portions, usually just myself, and I use what I have in my pantry (which isn't a lot), unless I'm dying for something different. So, without further ado, here's what I'm having for dinner tonight!

Salsa Chicken
I half made this recipe up and half got it off the internet. It's been about a week and a half since I've been to the grocery store, so I have very little to work with. I also bought a jar of salsa for the 1/4 bag of tortilla chips I had left over, and the chips are gone but the salsa is still here. I also didn't have taco seasoning, so I had to get creative. I'm eating it as I type this, so I know it's delicious!
Here's what you'll need:
1 or 2 small boneless, skinless chicken tenders, thawed. (I bought a huge bag of individually frozen tenders. They're smaller than chicken breasts, and they will last you literally forever. This is a staple in my fridge.)
Salt
Pepper
Garlic Powder
Onion Powder
Chili Powder
At least 1/2 jar of salsa (I used Joe T's because that's my fave.)
Shredded cheese

Here's what you do:
1. Preheat your oven to 350
2. Lay the chicken in a small baking dish, and sprinkle seasonings on both sides.
3. Spoon salsa (however much you want) on top of the chicken.
4. Bake for 25 minutes. Be sure to cut into it & make sure it's cooked, I've heard food-borne illnesses are quite unpleasant.
5. Sprinkle a little cheese on top & pop it back into the oven for a few minutes until the cheese has melted.
6. DINNER.

I paired mine with a little rice & corn for a balanced meal. I keep bags of frozen vegetables like corn & green peas on hand & throw a little into a bowl with a splash of water into the microwave for about 3-5 minutes. That's probably not the best way, but it's better than not eating vegetables, and I don't have to clean an extra pot.


So there it is! It was super delicious if I do say so myself. Hopefully I'll go to the grocery store soon & come up with some new ideas! Until next time!

Friday, July 20, 2012

DIY- Ribbon Board Re-Do


Hey Cats!

In 21 days, I will be moving back to the Promised Land, into a house with three other girls. And I am SO EXCITED. Since I'm transitioning from the dorm to a real house, I've changed things up a little bit, including the color scheme of my room. You may remember that I went with a beach theme in the dorm, light blues, greens, coral, etc. This time around, I've decided to go with light blue, gray, and dark purple. I've been able to keep a lot of my blue stuff, like my bedspread, pictures, lamps, and pillows. I've also decided to re-do a couple of things I already had. I didn't want to part with some of it, and I still needed some, so instead of spending lots of money on buying new things, I spent a little money on updating them! One of the things I had that I absolutely loved and did not want to get rid of was a memory board my aunt made for me. I love pictures, so I obviously can't do without one of these. The only problem was that it was lime green, which totally doesn't match my room anymore. So I got some new fabric & ribbon, and an hour or so later, I had an updated version of one of my dorm room faves!
This is what I started with. Isn't it cutie? Sadly, not with purple and blue.

Here's what you will need:
-1 memory board (Mine is made out of one of those posterboards with the foam and a thin layer of cotton quilt batting. If you have one you bought from somewhere, you could still try this, but it will probably be more difficult to take apart, but I have faith in you. Just don't injure yourself. OR if you want to make one, just get one of the posterboards mentioned above & some quilt batting!)
- Enough fabric to cover the front of the board. I used 1/2 of a yard, and have plenty left over to make pillows with!
-Ribbon. I just used one spool, but I probably should have used two.
-Brads, furniture tacks, or buttons. I used some really cute brads from the scrapbooking section in Hobby Lobby.
I hadn't bought the brads yet. Sorry. Also, that's my favorite nail polish.

Here's what you do:

1. First, remove all the buttons or tacks from the board. Mine were buttons, so it was fairly easy to just cut them off, but if yours has tacks, it might be a little harder.
2. Second, using a staple-puller, flat screwdriver (what I used), scissors, or your fingernails (which I wouldn't reccommend, then they'll look like crap), remove the ribbon. Make sure you don't accidentally remove the staples that are holding down the fabric, just the ribbon!

3. Next, measure and cut the fabric. I did this by laying the fabric print-side down on the floor and laying the board fabric-side down on top of it. Then I cut it, leaving enough fabric on each side to overlap & staple down on the back. Also, make sure you iron your fabric before you staple it, because wrinkles are ugly, and that it's pulled really tight, because it will also be ugly if it's loose.
Before I cut it, obviously. I used the existing fabric as a guide for how much fabric to overlap.
4. Now you're ready to staple! Make sure that the fabric is tight, and if it has a pattern that the pattern is straight. I folded the edge of mine twice and then stapled it. I used just a regular stapler, because I wasn't sure if heavy duty staples would have gone through the front. This part takes the longest, but it's not hard! Just make sure that every staple gets in there like it's supposed to, or else it won't hold together very well. Keep going all the way around! I would suggest using extra staples on the corners, since you'll probably have more fabric there.

This is the double fold, before I started stapling. Make sure it extends a little further than the original fabric.

Here's what the back looks like finished!

And here's the front!

5. Ribbon time! Take the end of your ribbon and staple it on the back of the board, diagonally through the center of the point on the corner.
It's not very pretty, but you get the idea.


6. Next, stretch the ribbon diagonally across the board, making sure it's tight and straight. Staple the end to the back side of the opposite corner from which you started.
Be sure to pull it really tight, or your pictures will fall out!

7. Do the same thing on the opposite corners.
I'm running out of things to say for photo captions...
8. Continue adding ribbon to make more small diamonds. I measured the distance from the middle to make sure I spaced them evenly.
I probably could have used more ribbon, but this will be fine, too!
9. Now it's time for the brads/buttons/whatever. Like I said, I used brads from the scrapbooking section, but if you want to use buttons or something more sturdy, that would probably be wise.
10. Poke a hole where you want the brad to go, usually in the middle of where the two ribbons cross. My brads didn't go all the way through all the layers, so I used a nail and my brute strength to push it through.
If you're using buttons, skip this step & just sew it on. Good luck with that.


11. Take your hole-poking tool out and replace it with the brad. Secure it on the back by folding the prongs down.


It's a rose!


12. Repeat for each ribbon intersection! I used a different brad for each one, and it turned out super cutie!


So there it is! This was super easy and inexpensive, and I can't wait to put it up in my room and fill it with pictures! I have a few more DIY's coming soon, and hopefully I'll be able to do another recipe before I leave for school! Until next time! 


Thursday, July 19, 2012

DIY- Tacky Tourist Tee Redo

Hey Cats!
 So, as you know, I recently went on a trip to New York, and I'm ready to pack my bags and go right now. I'm not one to buy souvenirs on trips, or at least souvenirs that have anything to do with where I am. I usually just go shopping and whenever I wear something, I'm like, "Oh, I remember when I bought this in D.C." and that brings back great memories. In my opinion, it's a waste of money to buy crap like a statue of the Empire State Building that I'll just sit somewhere and let collect dust. (Or I'll break it. That happens a lot.) It's much more practical to buy something you'll wear a lot, and it's still a great reminder of the fun time you had on your trip. At least that's how I justify it. (Also, I think coffee mugs are a nice practical souvenir. You always need those!). In addition to my rampant spending spree in Chinatown, (I literally threw nearly $100 at pushy Asian people in less than ten minutes. It was INTENSE) I bought one of the classic American tourist pieces. Yes, that's right. I bought an "I <3 NY tee. We all did, because we were going to pull an Ultimate Tourist Move and wear them all to the airport when we left. Also, I'm not going to lie, I've secretly wanted one all of my life. So I bought it. They're like, $3 at every single gift shop in the Big Apple, so it wasn't like I was squandering a chunk of money on a splatter-painted "I <3 DC" sweatshirt. (Yes, I did that one time. I don't want to talk about it. I wear it indoors and on snow days under a big jacket only). However, once I got home, I had to be real with myself. I was never going to wear that shirt again. So, not wanting to waste my $3, or one of my only true souvenirs, I decided to give it a little update. T-shirt DIY's are all over Pinterest, so I found one I liked, grabbed my scissors, and ended up with this little gem:
Since I didn't take pictures during the process, and because I don't want to write out all the instructions, I'll just direct you to the link I used.
http://blogilates.com/printables-2/diy-racerback-workout-shirt-tutorial
I followed the directions for the most part, except for the hi-low hem, because it was already kind of short. It's not perfect, but like I always say, it adds character and makes it unique. It's a great pool shirt and workout shirt, if you work out. I don't. But if I ever do, maybe I'll wear this. Anyways, it's a great option for making a tourist tee a little less tacky, or for an awkwardly-fitting shirt you don't want to throw away. Also, just a tip: One of the girls told us when we purchased the shirts not to dry it in the dryer, because the letters would melt off. I would heed this advice, because I washed mine & hung it to dry, and the letters are already wrinkly and kind of merrr looking. Anyways, I hope you'll try this with a tourist tee, or any other tee you may have lying around! I'm working on multiple crafts for my new house, and I'm excited to finish them and share them with you! Also, I have a special suprise project I'm working on, but I can't tell you about that for a while. I might not actually finish it.... But anyways, until next time!

Thursday, June 28, 2012

Princess Pink Cookies

Hey Cats!

I know that I said my next blog post would be about my day in NYC, but I haven't wanted to do that yet. Also, since I plan on becoming the next Martha Stewart, I decided blogging about food would be a step in the right direction. But I really am going to post about it soon, before I forget! Before we get to the star of the show, let me tell you a little bit about my summer. I've been taking my math class, so that's what I do in the mornings, and study a little at night. It's actually my most sucessful attempt at a math class in my entire life, so I'm pleased with that. I also have like, 5 other craft projects I'm working on, and I'll be excited to share those when (if) I finish them! I also have been searching all over town for a paperback copy of Mockingjay. I read the first two Hunger Games books in less than a week, and I'm absolutely DYING to read the third. I found one today at WalMart, but in the checkout line, I realized it was large print, so I put it back. I have a thing about large print books. They just bother me & my eyes kind of freak out. Also, I feel like I'm reading a "chapter book" I would have read in like, the second grade. You know what I mean. Books like Junie B. Jones, The Magic Treehouse series, and whatever else you read as a child all have that like, 20 point font. That's what large print reminds me of, and since I am no child, I can't stand it. So, the search continues. I started reading Jane Eyre, but I've only gotten through three chapters, and while I love the Bronte sisters and their literary masterpieces, I'd honestly rather just find out what happens between Katniss and Peeta. #sorryimnotsorry. Also, I got a new planner today on my weekly trip to Target. It's honestly kind of sad how excited I got about it. It matches the cover I have from last year, and it has a beautiful pattern on the pages. Oh yeah, this is supposed to be about cookies. Whoops.

These are seriously the easiest cookies you will ever make in your entire life. I made them in New York, and they were wonderful, so when I saw pink lemonade cake mix at WalMart today, I was overjoyed and purchased a box. Now, I've made cake mix cookies before, but apparently not many people have heard of them, so I'm trying to spread the word. Also, these are pink, which makes them ten times better, because I feel like princesses would only eat pink cookies. The lemonade flavor is really different than what you'd have every day, and it's great for summer! Anyways, here's what you'll need:
-1 box Pink Lemonade Cake Mix (I used Pillsbury, you can use whatever...if anyone else makes that kind)
-2 eggs
-1/2 cup vegetable oil
The beginnings of cookies fit for a princess. Or a 5-year old.


Here's what you do:

1. Pre-heat your oven to 350.

2. Mix together the cake mix, oil, and eggs, until you get a little pink bundle of joy like you see below. You might think that you need to add a little more liquid, but if you keep mixing, it'll be okay. I had a few lumps of mix left in mine, but I just said YOLO and continued on with my life. (not really, I hate that phrase. But I did leave them and it was fine.)

The dough reminds me of edible play-dough I made in my childhood. But it was peanut butter. But still awesome.

3. Next, spray your baking sheet with some pan. The dough is really oily, so it's probably not 100% necessary, but I like to be on the safe side.

4. Next, I rolled the dough into little balls and placed them on my cookie sheet. You could totally do rounded teaspoonfuls if that's your thing, but I like uniformity in my baking, so I chose to roll them.
My vain attempt at an artistic camera angle. I think I'll just stay on the other side of the camera. lawlz.
5. Bake for 12.5 minutes. This is very exact, and I'm kind of proud of that, since I was winging this one. You can tell when they're browning on the edges, and that's when they're done. But, if you take them out and they still aren't firm after a few minutes, I'd put them back in for like, 2 minutes. 12.5 should do the trick, but if you don't believe me, experiment at your own risk.
I love how they're crackly on top.


6. Eat them. (Not all of them, I don't promote obesity.)
Plate of Pink.


See how easy that was?? Just six steps, and the last one was unnecessary! Apparently you can make these with any cake mix, so the possibilities are basically endless. Except I'm not sure how it would work out with an angel food mix...someone please try that and let me know. Rebecca, the precious girl from Georgia that we met in Long Island, told us that if you use a lemon cake mix and use a little less oil and add a little lemon and orange juice, they're divine! So I'll probs be trying that one soon. Anyways, the point is, you're only a box, two eggs, and half a cup of oil away from wonderful cookies. I hope you try this and love it as much as I do! And I promise I'll write about New York next time. In the meantime, hopefully I'll find Mockingjay and fun activities to write in my new planner. Until next time!


Wednesday, March 14, 2012

Brownie Buttons- Recipe

Hey Cats!

Since I'm home for Spring Break this week, I actually have time to blog! I was planning on crafting as well, but then I went to Barnes & Noble & bought myself a couple of books, so crafts aren't really happening this week. Between the chapters of my British literature & hanging out with my family however, I whipped up some delicious cookies! I wanted to bake something, and we had a brownie mix, so I decided to get creative! Actually, I just Googled, but whatever. I've found you can find a recipe for basically everything if you google it. Anyways, I wanted to make cookies out of a brownie mix, so I typed in "brownie mix cookies" on the world's most convienient website, and took the first recipe I came across. (I'm going to write out the recipe, but here's the link, just to give credit where credit is due: http://www.cooks.com/rec/view/0,1710,148185-235195,00.html ).
Here's what you'll need!
1 box of brownie mix (I used Pillsbury)
1/4 cup of flour
1/4 cup vegetable oil
3 tbsp. water (I used a little less)
2 eggs
1 cup chocolate chips (I used 1/2 cup of chocolate chips & 1/2 cup of Heath Bar bits)

Here's what you do!
1. Mix everything together, except the chocolate chips, by hand.
2. Stir in the chocolate chips.
3. Drop by VERY VERY SMALL spoonfuls onto a greased cookie sheet.
4. Bake at 350 for 10 minutes!

The reason I suggest making them very small is because
1. The batter goes further. More cookies = more reasons to smile
2. This batter spreads like none other once it's in the oven. If they're too big to begin with, all the cookies will run together & make fat, ugly cookies, which is a personal peeve of mine.
3. Smaller cookies are much easier to remove from the pan. These are very fragile too, so the smaller you make them, the easier your life will be.

Also, I HIGHLY advise using Pam on the cookie sheet between each batch. For real, spray that stuff on thick. Scraping burnt-on crap off a cookie sheet is not what you want to be doing when you have a Jane Austen novel waiting for you. Or ever, really.

Here's what my first batch looked like (Please don't laugh...I learned from my mistakes.) :

This is why you make them small, or else they turn out looking like cow patties. By the way, I considered naming these creations "Cow Patty Cookies" for about .032 seconds, but then I decided that was disgusting. I may be from East Texas, but that's just too much. I hope I didn't ruin this for anyone by saying that....
Here's what they looked like once I finally figured everything out!
Much better! They're quite delicious, if I do say so myself. They're kind of chewy, and they taste pretty much the same as a brownie, they're just in cookie form. Well, I go back to school on Sunday (I can't wait for that, by the way), so it might be a while before I blog again. Maybe next time I'll give a literary analysis of Emma, if I have it finished by then. I would like to state that at this point, I think Emma is a bit of a brat & if I were Harriet, I would be royally cheesed off at her. But Harriet's stupid. I'll save this for another day ;) Until next time!

Saturday, January 28, 2012

DIY- Links and Leather Bracelet

Hey Cats!

I am so happy to have finally finished this project! I bought all the materials back home before I came back to school, and I finally got around to finishing it this afternoon! My original plan was to follow the exact directions from studs and pearls for the Lanyard Double Chain Bracelet (http://www.studs-and-pearls.com/2011/09/diy-lanyard-double-chain-bracelet.html), but sadly, I purchased the wrong kind of chain, so I tried, but my efforts failed. However, I might try to make it again, this time with the correct type of chain! Nevertheless, I like what I came up with, and it still has the same idea of the studs and pearls bracelet.
Here's what you'll need:
- Enough chain to go around your wrist twice (I bought mine the length that you see above, and didn't cut it, so if you're going to cut yours... I have no tips on how to help you. Godspeed.)
- Jump rings (I bought a package of like, 100 & used 5)
- Lobster clasps (you'll only need one, but I bought a 4-pack for future use, it's cheaper that way)
- Leather cord (You can buy the huge spool if you'd like, but that's about $15, and mine was around $4, and I still have plenty left over)
- Needlenose pliers (I think people who aren't from East Texas know these as jewelry pliers. I didn't have any, so I improvised...with a wrench. It was painful.)

And Here's what you do! :
1. First, cut a piece of leather cord, about 55-60 inches. I cut mine 60 inches when I was attempting to make the first bracelet, and so I just kept it. But I cut off around 5-7 inches when I was done, so it was a little long.
2. Locate the center link of the chain. This can be easily done by folding the chain in half, matching the two ends up, & see which link is the middle. Thread the leather cord through the center link, making sure both tails of the cord are even.
Also, to make sure you don't lose the center link (this will matter more once you start threading the cord on both sides), tie a small piece of ribbon around the center link. Or you could go ahead and put a jump ring on.

3. Begin threading the leather cord through each link of the chain. Make sure you don't pull too tight or the chain will get all caddywompus, and we can't have that, now can we?? But seriously, make sure the chain stays somewhat flat, and be careful not to twist the leather. 

4. Continue threading the leather through the chain until you reach the end of that half of the bracelet. This is what you should have:
5. Repeat steps 3 and 4 for the other side of the chain.
6. Once you finish threading the cord, you'll need to tie off the leather. Before you cut it, bring the end of the cord back through the last link of chain, towards you. You should then have a loop of leather cord at the top of the link. Bring the end of the cord up through that loop, away from you. After you pull tight, you should have a small knot.Just cut the excess cord off and it should be sturdy! (I understand that these instructions are a little difficult to understand, but I have full confidence that if you've gotten this far, you must have some level of intelligence and will be able to figure something out. Use your problem-solving skills.)
7. On the center link (the one you tied the ribbon to), attach two jump rings. The easiest way to do this is to open just one, using the pliers. Or you can pry it open with your fingers like I did, but my broken fingernails and still-hurting fingers strongly urge against it. Next, slip the ring onto the center link, but don't close it yet! Take a second closed ring and slip it onto the open ring. Then, again using the pliers, squeeze the first ring closed, making sure it is closed tightly so it doesn't break.


8. Next, on the end with the two leather knots, attach a jump ring to both of the end links on each side, and then connect them to each other
9. Then, open a new jump ring and slip it onto one of the two jump rings attaching the loose ends. Place a lobster clasp on the open ring, and then close it with the pliers, making sure it's closed tightly!
And you're done! Here's what it looks like!

I'm super excited to wear this! I hope you will try this, and give it your own little spin! You could use different colored leather cord or chain, or you could use lanyard or even strips of fabric. I chose the black and gold just because it's versatile and classic, but I will probably make another one that's a little more trendy! I don't really know what my next project will be, and I'll probably just post a blog post without a craft next, because school/life is about to start getting a little cray. So if you don't hear from me, I was most likely taken captive by Psych 107 and Comm 243, so please come find me. Until next time!

Friday, January 13, 2012

Pinterest Project- Star Blanket

Hey Cats!

So, as you all know, next August I will be moving into a house with my 5 besties. I know it's kinda far away, but that gives me plenty of time to craft! My froomie Amy & I already have big plans for the place. We'll be covered in handmade items by the time we actually move in! Anyways, over Christmas break, I made an afghan for the house. We haven't decided on colors or anything yet, but it has pretty much every single color in it, so it should match whatever! If not, we can just hide it in a closet & take it out when we get cold! I found this pattern on Pinterest, so instead of giving you instructions, I'll just include the link! This blanket was perfect, because I was able to use lots of leftover yarn that I already had, so I only had to buy 4 skeins, which is pretty good for a blanket! Also, it says to change yarn every few rows, but I decided to just keep going until I ran out of yarn, or thought that I couldn't make it another round. It would also be cool to do the whole thing in the same variegated yarn, or even in one solid color. Use your imagination! Anyways, here is the link! http://www.purplekittyyarns.com/crochet-afghan-patterns/7-point-star-throw
And here's what mine looks like!
Also, to finish it, I just did the round of slip stitches, I didn't do the thing with the tapestry needle....mainly because I didn't know how :). I hope you will try this & make it your own! It's one of the easier blankets I've made, & I like it because it's different!
On a different note, I will be leaving to go back to school tomorrow morning! I'm so excited to start my second semester, and to see all my friends! That being said, I probably won't be blogging as much anymore..mehhh. BUT! I have purchased the materials for my next DIY, and so I'll probably put that up soon! And I promise I will have plenty of crafts over the summer! I might post occasionally, but it might not be crafts....we shall see! Until next time!

Friday, December 30, 2011

Recipe- "In Mint Condition" Brownie Bites

Hey Cats!

So, I'm very excited to share this recipe with y'all! It came about when my mom asked me to bake brownies for dinner with some of my extended family. Instead of just making a pan of brownies like your average person, I decided to get a little creative. Also,we had a package of chocolate and mint chips, and I didn't want to just mix them in the batter, so I melted them & drizzled it on top like ganache! Anyways, I'll just go ahead & let you try them for yourselves!
Here's what you'll need:
1. A boxed brownie mix & all the ingredients needed to make the brownies. I used Pillsbury Chocolate Fudge, but you can use whatever! Or if you're feeling super domestic, you can make the brownie batter from scratch!
2. One 10-ounce package of chocolate & mint chips. I used Nestle, but I think they might be a seasonal item, so if you're not making this around Christmas, I think you can get Andes chips, which would probably work just as well!

3. A muffin tin
4. Pam or other non-stick cooking spray. (VERY important)

Here's what you do:

1. Prepare the brownie mix according to the directions on the box.
2. Distribute evenly (mine was about two huge spoonfuls per hole) in a muffin tin coated VERY WELL in Pam. They stick a little no matter what, but I can't imagine what would have happened if I didn't use anything.
3. Bake at 350 for 12-15 minutes.
4. During the last few minutes of baking, melt half of the chocolate & mint chips, according to the directions on the package. For some reason, I expected it to be green since some of the chips were, but...it wasn't.It was a light brown.

5. Once the brownies are done, go around the edge of each brownie with a knife to make sure they don't stick. After they are cool, remove them from the muffin tins. You'll probably have to use the knife again & be very careful so they don't fall apart!
6. Drizzle each brownie with the chocolate. You can make designs if you have that kind of talent, and if you do, I applaud you. I always stick with the abstract look, it's easier & perfection is optional :).
7. Enjoy! If you let the chocolate set a little, it turns into a ganache-like consistency and is extra delicious!

I really hope you try these, they're super easy, but different from your average brownie! I have forbidden myself from going to Hobby Lobby until I finish my current project, so it might be a couple of days until I'm able to post again, but I promise it will be amazing! Until next time!

Monday, August 15, 2011

DIY- Nautical Wastebasket

Hey Cats!

It's been SO LONG since I've posted! I've been super busy with camps and getting ready for college, so I haven't really had time to blog, much less craft! This is something for my dorm room, and I feel like it's kinda cheating, because I painted it with my friends at the beginning of summer. But I'm going to share anyways! As I may have told you, my room is a beach theme. I wanted to incorporate the theme without making it look like a tacky beach house, which has been slightly difficult. I thought that the little rope detailing on this trashcan gave it just the right touch of nautical-ness. You can definitely change this up to match whatever room you're wanting to put it in. I've actually painted one for my room at home, and my sister painted one for our bathroom. It's a great way to add a pop to a room, and it's a good small project when you're feeling slightly crafty. Anyways, here's what you'll need:

- 1 wooden trashcan (I've always gotten them at Hobby Lobby)
- Acrylic paint of your choice (navy & white for stripes)
- Masking tape (for making stripes)
- Hot glue gun
- 1 piece of clean rope that will go around the top of your trashcan

Here's what you do!
1) Paint your trashcan in whatever color or pattern you'd like. For my stripes, I painted the entire trashcan white (I'd recommend using multiple coats). Then, I placed masking tape in straight lines, leaving stripes in between the tape that were the width of the tape. Make sure you press down the edges of the tape so the paint doesn't seep through. Paint the spaces in between the tape and remove the tape when it's dry! I also recommend painting the inside and bottom of the trashcan for a more polished look.
2) Next, cut your rope to a length that will go all the way around the top of the trashcan, giving yourself no more than an inch extra.
3) Tape the ends of the rope so it doesn't fray.

4) Glue one end of the rope to a corner of the trashcan, making sure it lines up directly. You should use a thin line of glue and will probably have to hold it down a while for it to stay.

5) Continue gluing the rope onto the trashcan in small sections.
6) When you reach a corner, chances are (unless you use super skinny rope) you will have to cut the corner in order to turn. Just glue the rope all the way to the corner and then just skip the pointed part of the corner. This is a little hard to explain, so just look at the picture :)

7) Continue gluing the rope until you reach your starting point. You might have a little rope left over, but don't cut it off!

8) Take the extra rope and glue it on top of the other rope, as if you were going to wrap it around again. This time will require LOTS  of glue, and you'll probably need to hold it down for a few minutes to make sure it sticks.
I know this looks a little messy, but just put this part against the wall :)

And you're done! Here's what it looks like!


I'm super excited about this, and I can't wait to see it in my dorm room in 6 DAYS!!! OMG. That being said, since I'm going to college and might have actual social events to attend, I'm not really sure how often I'll be crafting. I won't give it up of course, but it might not be such a giant part of my vida anymore. :( BUT I'm taking all my stuff with me! I have a tub to put it in and everything! So, until next time, whenever that may be!